
Most people do not have an AI problem. They have a workflow problem.
They already have ChatGPT, Claude, Gemini, or another model open in one tab. The friction starts in the tabs around it. They find an article, paste it into an AI tool, copy the result into Notes or Notion, rewrite the summary, decide whether it matters, draft a social post, save a URL somewhere, and then lose track of what was approved, what was rejected, and what still needs attention.
That is the real job n8n solves. It is not mainly about replacing your judgment. It is about stopping you from wasting your judgment on repetitive glue work.
n8n is useful because it sits between simple no-code automation and heavier developer-built systems. It gives you a visual workflow builder, but it still leaves room for code, APIs, self-hosting, AI models, and human approval. That combination matters if you want to build automations that can grow past toy demos.
If you want a simple mental model, use this:
If Zapier is a power strip, n8n is closer to a control panel.
That does not mean n8n is hard. It means you get more room to design the system instead of only connecting two apps and hoping nothing breaks.
At the time of review, n8n describes its platform as a way to build visual AI agents and workflows, go deeper with code, connect to external tools, and deploy on your own infrastructure or theirs. n8n also says it supports over 500 integrations, while its pricing page says plans are based on workflow executions rather than charging separately for every internal step.
This article is not about building a magical autopublisher. That is the wrong beginner goal.
The goal is to build one reusable AI automation pattern you can adapt for research, blogging, lead qualification, support triage, and personal knowledge systems.
What n8n Actually Solves
n8n is not just a “connect app A to app B” tool. That is the shallow version.
The deeper value is that n8n lets you design repeatable workflows with triggers, data handling, AI steps, branches, human approval, logs, and final actions. That makes it especially useful for people building content systems, small business automations, research pipelines, technical blogs, or internal operations.
Before building anything, learn six terms:
| Term | Simple meaning |
|---|---|
| Trigger | What starts the workflow |
| Node | One step in the workflow |
| Credential | The saved connection to another service |
| Execution | One run of the workflow |
| Branch | A conditional path, such as approved vs rejected |
| Human review | A pause point where a person approves or rejects an action |
That last one matters more now because AI is finally useful enough to automate real work. Useful enough also means risky enough to create bad drafts, send awkward messages, publish weak content, leak private data, or trigger actions you did not properly review.
A serious beginner workflow should not start with “let AI do everything.”
It should start with:
Let AI prepare the work. Let a human approve the risky step.
That is the difference between automation and chaos.
The Reusable Workflow Pattern
The best beginner move is not to collect random templates. It is to master one reusable pattern:
Trigger → Collect → AI Process → Human Review → Action → Log
| Stage | What it means | Beginner example |
|---|---|---|
| Trigger | Something starts the workflow | RSS item, schedule, form submission, chat message |
| Collect | Pull the data you need | Article URL, lead details, support message |
| AI Process | Summarize, classify, extract, or score | Summary, category, lead-fit score |
| Human Review | Pause before anything risky | Approve or decline by email, chat, Telegram, or Slack |
| Action | Save, send, draft, assign, or notify | Create draft, update CRM, assign ticket |
| Log | Record the result | a spreadsheet, Notion, Airtable, execution logs |
That pattern is simple enough to understand and strong enough to reuse. It also fits how production-minded AI workflows should work: the model can assist, but it should not quietly make irreversible decisions without a review layer.
       Trigger → Collect → AI Process → Human Review → Action → Log
                                       ↓ Decline
                                   Log rejection
For a technical publication, this pattern becomes a safe research and draft queue. It can watch sources, summarize useful stories, propose angles, ask for approval, and store approved ideas for later editing.
That is the exact system you want before attempting full automation.
What You’ll Build
By the end, you will understand how to build a reusable n8n workflow that:
- watches a source like RSS, a saved URL list, or a scheduled research queue
- collects the source title, URL, excerpt, body text, and publication date when available
- summarizes the source with AI
- extracts a technical angle and possible headline
- asks you to approve or decline the item
- saves approved ideas into a spreadsheet, workspace, or CMS draft queue
- logs rejected ideas so your workflow develops editorial memory
The output is not a finished article. It is a structured draft pipeline.
That is intentional. The first version of a serious AI workflow should help you move faster without removing your judgment.
Recommended Beginner Workflow
A clean beginner version looks like this:
| Step | n8n node | What it does | Beginner configuration |
|---|---|---|---|
| 1 | RSS Feed Trigger or Schedule Trigger | Starts the workflow | Watch one feed or run every few hours |
| 2 | HTTP Request | Pulls the source page or source data | Fetch the article URL or saved URL |
| 3 | AI model node | Summarizes and extracts fields | Use structured prompt output |
| 4 | Edit Fields / Set | Normalizes the output | Rename fields into stable labels |
| 5 | Send Email | Sends approval request | Use “Send and Wait for Response” |
| 6 | IF | Branches approved vs declined | Continue only if approved |
| 7 | spreadsheet, workspace, or CMS | Saves the result | Create row, page, or draft |
| 8 | Log | Records the final state | Save approved/rejected status |
This is boring in the best possible way. Boring workflows are easier to debug, easier to trust, and easier to monetize because people can actually follow what is happening.
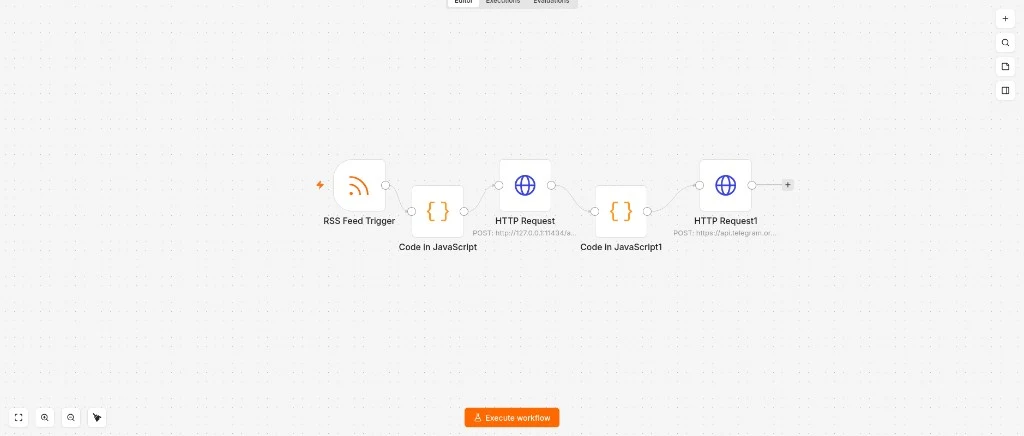
A real n8n canvas: RSS trigger feeds into JavaScript processing nodes and an HTTP request to an external API.
Step 1: Choose the Trigger
Start with one of two triggers:
- RSS Feed Trigger if you want automatic monitoring of a source.
- Schedule Trigger if you want the workflow to run every few hours and pull from a source list, Google Sheet, or saved URL queue.
For a media workflow, RSS is usually the cleaner first step. You can subscribe to official blogs, vendor advisories, cybersecurity sources, AI product updates, developer tool changelogs, or industry publications.
For deeper editorial research, a scheduled workflow pulling from a manually curated Google Sheet may be better. That gives you more control over what enters the system.
Good beginner trigger examples:
| Use case | Best trigger |
|---|---|
| Tech news monitoring | RSS Feed Trigger |
| Weekly article idea cleanup | Schedule Trigger |
| Lead qualification | Form submission or webhook |
| Support triage | Email trigger |
| Internal research assistant | Manual trigger or chat trigger |
For a technical content site, start with RSS and a manual approval queue. Do not start by autopublishing.
Step 2: Collect the Source
The collect step pulls in the raw material the AI will process.
For a beginner research workflow, collect these fields:
source_titlesource_urlsource_excerptsource_bodyif availablepublished_atif availablesource_namefeed_category
Your goal is not perfect scraping. Your goal is enough structured input for the model to produce useful notes.
If the source is an RSS item, you may already have the title, link, author, published date, and excerpt. If you need more context, use an HTTP Request node to fetch the page and then process the content.
Keep the first version simple. If the page is messy, summarize the excerpt and URL first. You can improve extraction later.
Step 3: Summarize With AI
At this stage, you do not need a multi-agent system. You need structured output.
Use an AI model step to produce:
what_happenedwhy_it_matterswho_is_affectedpractical_takeawaypublication_anglesuggested_headlinelinkedin_draftfull_article_candidateconfidence_level
A useful beginner prompt:
       You are an editorial research assistant for a technical publication covering AI web building, automation systems, cybersecurity labs, privacy tools, and hardware.

Analyze the source below for a technical beginner audience.

Extract:
1. what happened
2. why it matters
3. who is affected
4. one practical takeaway
5. one publication-style article angle
6. one suggested SEO-friendly headline
7. one LinkedIn post draft under 900 characters
8. whether this deserves a full article: yes or no
9. confidence level: high, medium, or low

Rules:
- Do not invent facts.
- Separate confirmed facts from interpretation.
- Avoid hype.
- Keep the tone clear, technical, and beginner-readable.
- Return clean structured fields.

Source title: {{ $json.source_title }}
Source URL: {{ $json.source_url }}
Source excerpt/body: {{ $json.source_body || $json.source_excerpt }}
Published date: {{ $json.published_at }}
Structured fields make the rest of the workflow easier. If the model outputs one giant paragraph, you create more manual work downstream.
For early publishing workflows, the AI should help you decide what deserves attention. It should not be trusted to publish final editorial copy without review.
Step 4: Normalize the Output
Use Edit Fields or Set to clean the AI output into stable field names.
A good schema:
       headline
source_url
source_name
published_at
what_happened
why_it_matters
who_is_affected
practical_takeaway
article_angle
linkedin_draft
full_article_candidate
confidence_level
review_status
reviewed_at
final_destination
Set:
review_status = pendingThis matters because stable field names make your workflow reusable. You can later send those fields to a spreadsheet, workspace, CMS draft, team chat, or database without rebuilding the logic.
This is where many beginner automations become fragile. They do not fail because the idea is bad. They fail because the data shape changes every time.
Step 5: Add Human Approval
For the first production-safe version, use Send Email → Send and Wait for Response.
This sends you an approval request and pauses the workflow until you approve or decline. That is exactly what a beginner needs: real human review without building fragile callback logic on day one.
A good approval email should show:
       Headline: {{ headline }}

Why it matters:
{{ why_it_matters }}

Article angle:
{{ article_angle }}

Practical takeaway:
{{ practical_takeaway }}

LinkedIn draft:
{{ linkedin_draft }}

Source:
{{ source_url }}

Decision needed:
Approve or decline draft creation.
Use approval buttons if available. Label them clearly:
       Approve draft
Decline
This gives you a real checkpoint. The workflow does not continue until you decide.
Later, you can move approval into Telegram, Discord, Slack, Gmail, or the n8n Chat interface. But email is a clean first version because it is simple and reliable.
Step 6: Branch Approved vs Declined
Add an IF node after the approval response.
If approved:
- create a row in a spreadsheet
- create a Notion page
- create a CMS draft if your publishing setup is ready
- save the source URL
- save the suggested headline
- save the AI summary
- mark the status as
approved
If declined:
- record the source URL
- mark the status as
rejected - optionally save a rejection reason
- stop the workflow
Do not treat rejected items as wasted work. Rejections are part of your editorial memory. Over time, they show you which sources, topics, and angles are not worth chasing.
Step 7: Save Approved Items
For a beginner setup, use a spreadsheet first.
It is not the most elegant database, but it is easy to inspect, easy to export, and good enough for a first content pipeline.
Recommended columns:
| Column | Purpose |
|---|---|
created_at | When the workflow found the item |
review_status | Pending, approved, rejected |
source_name | Where it came from |
source_url | Original link |
published_at | Source publish date |
headline | Suggested title |
article_angle | Editorial angle |
what_happened | Factual summary |
why_it_matters | Reader value |
practical_takeaway | Actionable point |
linkedin_draft | Distribution copy |
confidence_level | AI confidence rating |
final_destination | Sheet, Notion, CMS, LinkedIn, X |
When the workflow is stable, you can upgrade from a spreadsheet to Notion, Airtable, Supabase, or direct CMS draft creation.
For a technical publication, the clean beginner path is:
       RSS item
→ AI structured summary
→ human approval
→ content queue
→ manual revision
→ CMS draft
→ publish
→ social distribution draft
That keeps quality control where it belongs: with the editor.
Step 8: Log and Debug
A workflow that fails silently is worse than no workflow.
Use two logs:
| Log type | Where | What it answers |
|---|---|---|
| Business log | a spreadsheet, Notion, Airtable | What did we approve, reject, or draft? |
| Technical log | n8n executions | Which node ran, failed, paused, or waited? |
Your business log is for editorial memory. Your execution log is for debugging. Do not skip either one.
A clean log lets you answer:
- Which RSS sources are producing useful ideas?
- Which topics are repeatedly rejected?
- Which workflows are failing?
- Which approval requests are stuck?
- Which drafts were created but never published?
That is how a toy automation turns into a publishing system.
Cost Control: Understand Executions
n8n pricing is based on workflow executions, not every individual internal step. At the time of review, the n8n.io pricing page states that all plans include unlimited users, unlimited workflows, and every integration, with pricing based on monthly workflow executions.
That is useful for AI workflows because a multi-step workflow can still count as one execution when it runs from start to finish.
But you still need to think about volume.
A workflow that runs once per day is roughly 30 or 31 executions per month. A workflow that runs every five minutes can reach thousands of executions per month. A public chatbot can burn through executions quickly because every message may trigger another workflow run depending on your design.
For a content site, start with a controlled schedule:
       RSS source check: every 2–6 hours
Manual approval: required
Draft creation: approved items only
Social publishing: manual or separately approved
Do not expose expensive automation loops publicly until you understand execution volume.
Three Variations Without Rebuilding Everything
Once you understand the pattern, you do not need a completely new architecture for every use case. You just swap the trigger, source data, and final action.
1. Blog and News Workflow
       RSS Feed Trigger
→ Collect source
→ AI summary and article angle
→ Human approval
→ spreadsheet / workspace / CMS draft
→ LinkedIn/X draft
→ Log decision
Use this for cybersecurity updates, AI web development trends, automation tutorials, privacy tools, hardware launches, and software changelogs.
2. Lead Qualification Workflow
       Form submission
→ Collect request details
→ AI classification
→ Human approval
→ CRM row or email draft
→ Log lead status
The AI can classify the lead as: website project, automation request, consulting request, student housing lead, affiliate or vendor opportunity, sponsorship inquiry, or not relevant.
The important beginner rule stays the same: let AI classify and draft first. Do not let it automatically send final sales replies on day one.
3. Support Triage Workflow
       Support email
→ Pull message
→ AI category label
→ Human review
→ Draft reply or assign
→ Log outcome
The AI can label messages as: billing, technical, sponsorship, partnership, correction request, spam, or urgent. Classify and draft before you automate customer-facing sends.
n8n Cloud vs Self-Hosted
If you are a beginner, start with n8n Cloud.
That recommendation is not anti-technical. It is pro-focus.
You are trying to learn workflow logic, not troubleshoot servers, containers, SSL, backups, database persistence, reverse proxies, firewall rules, and update cadence at the same time.
n8n’s own Docker documentation says Docker is recommended for most self-hosting needs, but it also says self-hosting requires technical knowledge around servers, containers, resource management, security, and configuration. It recommends self-hosting for expert users and recommends n8n Cloud if you are not experienced managing servers.
| User type | Best option | Why |
|---|---|---|
| Total beginner | n8n Cloud | Fastest path to learning workflow logic |
| Solo builder validating ideas | n8n Cloud first | Lower setup friction |
| Comfortable Linux/Docker user | Self-hosted Docker | More control and ownership |
| Business with sensitive internal workflows | Depends | Choose based on compliance/security needs |
| Homelab/local AI user | Cloud first, self-host later | Validate the workflow before maintaining infrastructure |
Self-hosting is not bad. It is just not the first bottleneck for most beginners.
The Safety Rules Before Automating Anything Important
Start with drafts, not final actions.
Use human approval before anything you cannot easily undo:
- publishing articles
- sending external communications
- deleting data
- changing CRM records
- charging customers
- buying services
- updating production systems
- making high-value business decisions
Protect the accounts connected to your workflows. If your n8n setup touches Gmail, GitHub, Cloudflare, your CMS, OpenAI, Stripe, Notion, or Google Drive, 2FA should be standard.
Do not paste private client data, passwords, API keys, or sensitive documents into random experimental workflows.
Test with fake or low-risk data first. Read execution logs before activating a workflow. Add rate limits, batch limits, or manual checks before a workflow can annoy people at scale.
Document every workflow in one sentence:
This workflow watches selected RSS feeds, summarizes relevant stories, asks for approval, and stores approved ideas in the content queue.If you cannot describe the workflow in one sentence, it is probably too messy for version one.
Common Beginner Mistakes With n8n
Mistake 1: Trying to Automate Too Much
Beginners often reach for “AI agent that does everything,” when they really need “draft queue that saves me 30 minutes a day.” Start with the boring workflow that works.
Mistake 2: Skipping Human Approval
AI should not publish, email, delete, purchase, or update sensitive systems without a review layer in your early workflows. Approval is not weakness. It is quality control.
Mistake 3: Skipping the Log
If your workflow leaves no trail, you are debugging blind. Always save the source URL, output, decision, and status somewhere readable.
Mistake 4: Copying Templates Without Understanding Them
Before using a template, ask: What starts it? What data does it collect? Which accounts does it touch? What happens if the AI output is wrong? What happens if a node fails? Can I stop it quickly?
Mistake 5: Self-Hosting Too Early
If your first week becomes Docker logs and certificate issues, you are learning operations, not automation design. Cloud first is fine. Control can come later.
Mistake 6: Building Without a Clear Editorial Standard
For a publication workflow, the AI should not decide what is “good enough” by itself. Your editorial standard should decide whether the source is trustworthy, whether the topic fits, whether the article deserves full treatment, and whether the draft has enough practical value.
Useful Gear for Serious Automation Builders
You do not need a full homelab to start using n8n.
For most beginners, n8n Cloud is cleaner because it removes server maintenance and lets you focus on workflow logic. But if you eventually experiment with self-hosted automation, local AI, or always-on systems, a few pieces of hardware are worth considering.
| Gear | Why it helps |
|---|---|
| Hardware security key | Protects Gmail, GitHub, Cloudflare, CMS, n8n, and AI accounts |
| External SSD | Backs up workflow exports, drafts, datasets, logs, and local AI files |
| Mini PC | Useful later for self-hosted n8n, local AI, Open WebUI, Ollama, and homelab workflows |
| Second monitor | Keeps n8n, docs, logs, and AI output visible side by side |
| USB-C dock or hub | Connects monitor, Ethernet, SSD, keyboard, mouse, and other workflow gear |
A second monitor and USB-C dock are underrated workflow-building upgrades. Seeing your canvas, docs, logs, and AI output at the same time reduces basic mistakes.
Beginner Checklist Before Publishing Your First n8n Workflow
- Can I explain what starts the workflow?
- Do I know what data it collects?
- Do I know what the AI is allowed to do?
- Is there a human approval step before risky actions?
- Is the output logged somewhere useful?
- Did I test with fake or low-risk sample data?
- Are credentials stored properly?
- Is 2FA enabled on connected accounts?
- Can I identify where the workflow failed?
- Can I turn it off quickly if something goes wrong?
- Do I know how often it will run?
- Do I know where approved output goes?
If you cannot say yes to most of those, simplify first.
Editorial Verdict
n8n is one of the best tools for beginners who want to grow into serious automation builders.
It is not the simplest platform on the market, and that is partly why it is valuable. If you are ready to build, open n8n.io and start in the Cloud editor with the draft-queue pattern above. It gives you enough structure to start visually, enough depth to build real systems later, and enough AI capability to stay relevant as your workflows get smarter.
The best beginner move is not to chase ten workflows. It is to master one reusable pattern:
Trigger → Collect → AI Process → Human Review → Action → Log
Build that once for research, and you can adapt it to content, lead qualification, support triage, and personal knowledge systems.
n8n is not magic. It is a control panel. The quality of the workflow still depends on the quality of the system you design.
FAQ
Is n8n good for beginners?
Yes, if you start with a simple workflow. n8n can become advanced quickly, but beginners can use it safely by starting with one trigger, one AI step, one approval step, one output destination, and one log.
Should I use n8n Cloud or self-host n8n?
Most beginners should start with n8n Cloud because it removes server maintenance. Self-hosting makes sense later if you are comfortable with Docker, security, backups, updates, and infrastructure.
Can n8n automatically publish blog posts?
Yes, n8n can be connected to publishing systems, but beginners should not start with autopublishing. A safer workflow creates drafts, sends them for approval, and lets a human revise before publishing.
Is n8n better than Zapier or Make?
It depends on the use case. Zapier and Make are often simpler for basic app-to-app automation. n8n is stronger when you want more control, custom logic, self-hosting options, AI workflows, and technical flexibility.
Can I use n8n for a content site?
Yes. A strong beginner workflow is RSS monitoring → AI summary → human approval → content queue → manual article revision → CMS draft → LinkedIn/X distribution draft.
Does n8n charge per task?
n8n pricing is based on workflow executions, not every individual internal step. That can be useful for larger workflows, but you still need to watch how often your workflows run.
What should my first n8n workflow be?
Build a safe draft queue. Watch one RSS feed, summarize new items with AI, send yourself an approval email, and save approved items to a spreadsheet. That teaches the core workflow pattern without risking public mistakes.
Sources and Further Reading
- https://n8n.io/pricing/
- https://n8n.io/
- https://docs.n8n.io/advanced-ai/
- https://docs.n8n.io/advanced-ai/human-in-the-loop-tools/
- https://docs.n8n.io/integrations/builtin/core-nodes/n8n-nodes-base.sendemail/
- https://docs.n8n.io/workflows/executions/
- https://docs.n8n.io/hosting/installation/docker/
- https://github.com/n8n-io/n8n
QuBrite Dispatch
Operator-focused playbooks, system teardowns, and tech reviews. One email, weekly.
Newsletter launching soon. Subscribe via RSS in the meantime.